Click and hold a link button.
A link button has a white triangle in the corner.

The child toolbar opens.
Toolbars
Rhino opens with the default toolbar layout open. The default toolbar displays only three of the many Rhino toolbars. Most of the unopened toolbars are linked as child buttons to these three toolbars.
Click and hold a link button.
A link button has a white triangle in the corner.
The child toolbar opens.
Drag the title bar of the toolbar to a new position.
Drag the toolbar handle.
Release the mouse button to place the toolbar.
The title bar will appear on the toolbar.
Drag the title bar of the toolbar.
Drag the toolbar's border.
Drag the title bar to the edge of the Rhino graphics area.
Release the mouse button to dock the toolbar.
The toolbar reshapes, loses its title bar, and docks.
Note: To prevent a toolbar from docking when you drag it near viewport edges, press and hold the Ctrl key while you drag the toolbar.
In the Toolbars dialog box, under Toolbar collection files, select the toolbar collection name.
Under Toolbars, select a checkbox.
Or right-click in a blank space in the toolbar docking area or a toolbar handle and in the toolbar list, select a checkbox.
In the Toolbars dialog box, clear the checkbox for the toolbar.
Or right-click in a blank space in the toolbar docking area or a toolbar handle and in the toolbar list, clear a checkbox.
On the Tools menu, click Lock the Toolbars.
Or right-click in a blank space in the toolbar docking area or a toolbar handle and in the toolbar list, select the Lock toolbar checkbox.
Opens the Toolbars dialog box and manages the toolbars and toolbar buttons.
The Toolbars dialog box shows the contents of the toolbar layout. The toolbar layout holds the toolbars, the buttons in them, and the screen position of each toolbar. It also determines whether the toolbar is hidden or showing.
Options
File menu
New
Creates a new toolbar collection file.
Open
Opens an existing toolbar collection file.
Rhino Default Toolbar Collections
Rhino ships with two toolbar collections.
Note: toolbar collection files are located in C:\Documents and Settings\All Users\Application data\McNeel\Rhinoceros\4.0\ for Windows XP and C:\ProgramData\McNeel\Rhinoceros\4.0\ for Windows Vista.
Default
Uses 24 x 24 pixel buttons.
![]()
Default_32x32
Uses 32 x 32 pixel buttons.
![]()
Close
Closes the selected toolbar collection.
Close All
Closes all toolbar collections.
Save
Saves the selected toolbar collection.
Save As
Saves the selected toolbar collection as a different file.
Save All
Saves all toolbar collections.
Properties (Collection)
Opens the toolbar collection Appearance dialog box.
Tootips
Localize
Statistics
Number of toolbars
Number of buttons
Exit
Toolbar menu
New
Create new toolbar.
Import a toolbar from another collection.
Delete
Deletes the selected toolbar.
Add Button
Add a button to the selected toolbar.
Properties
Opens the Toolbar Properties dialog box.
Name
Names or renames a toolbar.
Button size in pixels
Sets the button size for the entire toolbar.
Note: The toolbar button size is set in the toolbar definition. If you link a different sized toolbar button into a toolbar, the bitmap icon will distort.
Collection
The name of the collection containing the selected toolbar.
Toolbar collection files
Lists the active toolbar collections.
Toolbars
Lists the toolbars in the selected toolbar collection file.
|
Tools > Edit Toolbar Layout
Tools > Toolbar Layout |
Move the cursor over the toolbar button.
Press and hold the Shift key.
Click the left mouse button and drag the toolbar button to a different toolbar or to a different position in the same toolbar.
Move the cursor over the toolbar button.
Press and hold the Ctrl key.
Click left mouse button and drag the button to another location in the same toolbar or to a different toolbar.
Move the cursor over the toolbar button.
Press and hold the Shift key.
Click the left mouse button, drag the toolbar button outside the toolbars and drop.
Open the parent toolbar that will contain the link button.
Open the child toolbar that will be linked to it.
Press and hold the Ctrl key.
With the right mouse button down, drag a button from the child toolbar to the parent toolbar.
A copy of the button appears in the parent toolbar with the white triangle link symbol in its corner.
Move the cursor over the linked button.
Press and hold the Shift key.
Click the right mouse button to open the Edit Toolbar Button dialog box.
Click the Unlink button.
In the Toolbars dialog box, right-click the toolbar name in the list, and click Add Button.
Or right-click the toolbar's title bar, and click Add Button.
Move the cursor over the toolbar button.
Press and hold the Shift key.
Click the right mouse button.
Edit Toolbar Button Options
Click to edit the button image.
Click to edit the button image.
Name
The name of the child toolbar.
Makes the last used button in the child toolbar to appear as the link button in the parent toolbar. This is useful if you want to change the toolbar button that appears in the parent toolbar as the link button or if you want the last button you used to appear as the link button.
If you normally use one button in a linked toolbar and rarely use the others, you probably want the one you use most to always appear on the link button. In this case, clear Float to Top.
Unlink
Unlinks the child toolbar
Tooltips
Left/Right
The text that appears in the tooltip for the button.
![]()
Note: The mouse icon appears automatically if there is text in either box.
Button text
Creates text to display on the button.
Show bitmap only
Displays the image only.
![]()
Show text only
Displays the text only.
![]()
Show bitmap and text
Displays both the image and the text.
![]()
Left/Right mouse button command
The command macro for the left and right mouse buttons.
See Rhino Scripting.
Edit toolbar button bitmap icons
You can clear the image, draw with the paint tools, capture a portion of the screen, or import a bitmap created with a paint program.
File menu
Import an image from a file.
Export the current image to a file.
Edit menu
Undo
Undoes the last action.
Copy
Copies the image to the Clipboard.
Paste
Pastes an image from the Clipboard.
Clear
The button image fills with the default background color.
Grab
Copies a rectangle from the screen.
Move the cursor square over a portion of the screen.
Click the left mouse button.
Shift
Shifts the image in the drawing area.
Note: You can also use the keyboard arrow keys to shift the image.
View menu
Zoom In
Zoom Out
Bitmap Drawing Tools
![]() Preview
Preview
Displays the button in actual size.
|
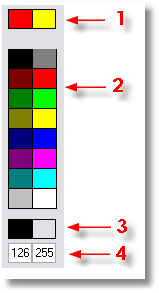
Current colors (1) Current left and right mouse button colors. Color palette (2) Standard 16-color palette. Custom Colors (3) Double-click to display color dialog. Alpha Channel (4) Set the transparency level for the color. Opaque=255 Transparent=0 |
|
Drawing area
Enlarged view of your bitmap. Use this area to edit your bitmap.
Drawing tools
![]() Line
Line
Draws a straight line.
![]() Fill
Fill
Fills a single-color area with the selected color.
![]() Pencil tool
Pencil tool
Edits the bitmap in the drawing area pixel by pixel.
![]() Color dropper
Color dropper
Click in the drawing area to select a color from the image.
Shows a specified toolbar.
Steps:
Type the name of a hidden toolbar of the current toolbar layout.
Use the Toolbar command to view the list of toolbars in the toolbar layout.
|
None
None |
Restores toolbars to the default layout.
|
None
Tools > Reset Toolbars |
Locks docked toolbars into place.
|
None
Tools > Lock Docked Toolbars Toolbar list > Lock Toolbars |